
")
A VCA, or Voltage-Controlled Amplifier, lets you use a voltage to control the amount of another signal that is allowed through to the output of the module. The higher the control voltage, the more signal is passed. At some voltage level, the entire signal is let through.
Note: Most VCAs could be more accurately called “Voltage-Controlled Attenuators” as they reduce the signal level (depending on the input CV), but they don’t usually amplify it.
When the control voltage is 0V (or below), no signal is passed and the output is silent.
VCAs have quite a few uses:
Volume Control
You can use your VCA to turn just about anything into a volume control. Run your audio signal through it, then connect the CV input to a mod wheel, foot pedal, or any voltage source you want.
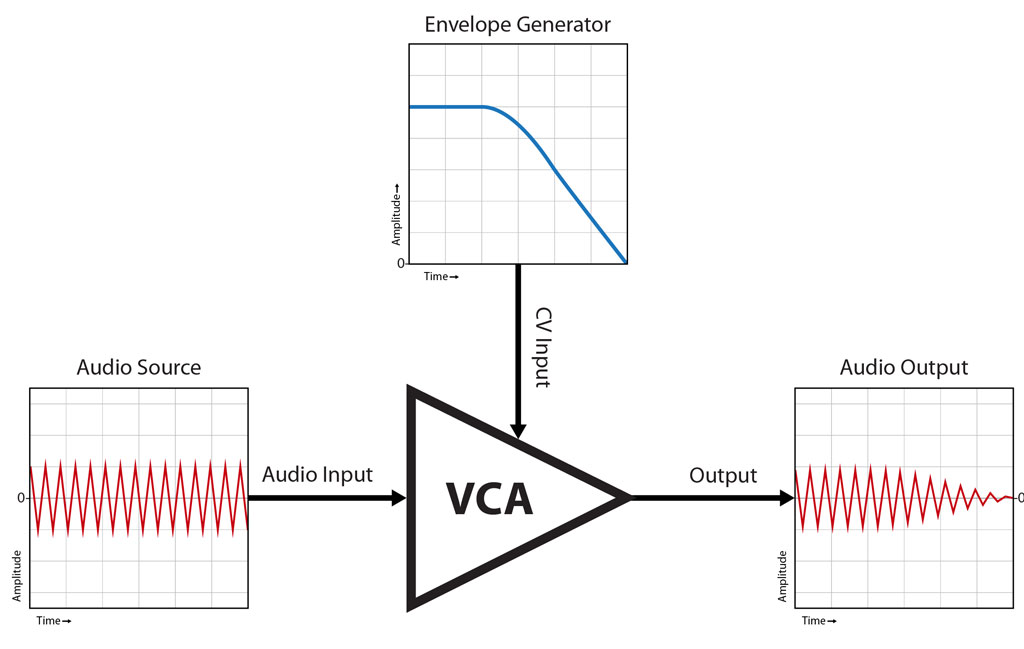
Envelope Shaping
One of the most common uses of a VCA is envelope shaping. Think about when you hit a key on a piano; the amplitude starts out pretty loud, then over time it fades away. If you let go of the key then the volume drops off pretty quickly. You can use a VCA in conjunction with an envelope generator to achieve the same effect with notes on your synthesizer.
An envelope generator (EG) is a module or circuit that generates a voltage that is triggered by something and changes over time (don’t worry, we’ll talk more about them later). If you’re trying to mimic a piano, you can configure the EG so that it is triggered by a key being pressed on your keyboard, it sends out a strong voltage at first, then it fades down to 0 over time.
The voltage sent out by the EG matches the way you want your amplitude to change over time. Connect the output of the EG into the CV input of your VCA and it will cause the amplitude of your note to fade out like a piano note.
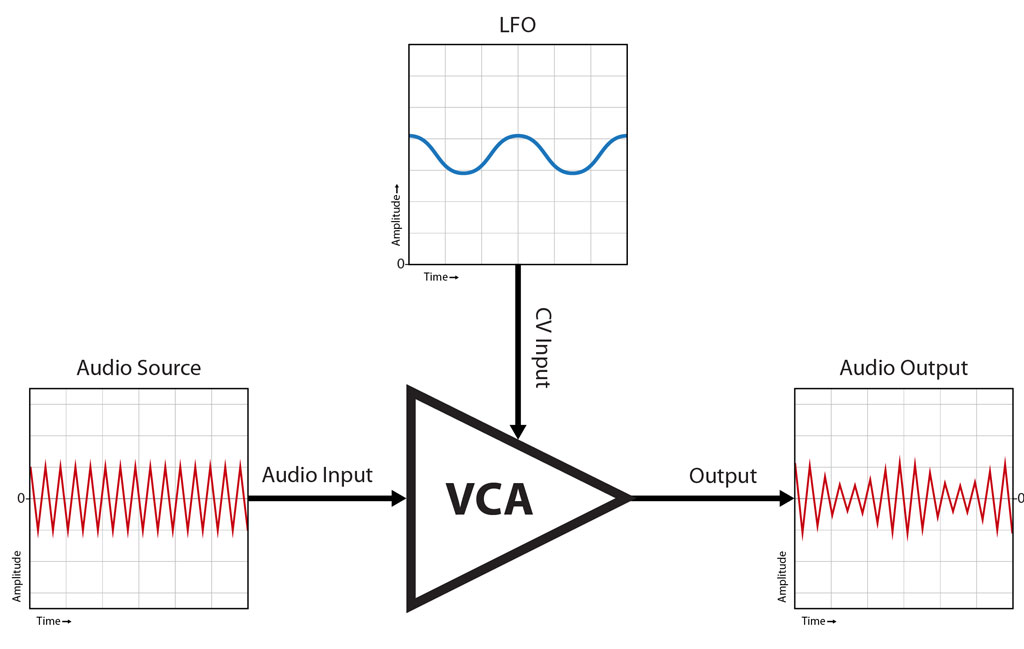
Tremolo
Mix a slow sine wave with some DC (to make sure the whole wave stays above 0), then feed them into the CV input of your VCA. The audio signal will mostly come through to the output because of the DC bias, but you will hear the amplitude get louder and quieter in time with the sine wave you are using to modulate it. This effect is called tremolo.
Amplitude Modulation
Tremolo uses a slow (3Hz, for instance) wave to modulate the amplitude of your audio signal, so you can actually hear the resulting loud/quiet cycles. If you increase the modulating frequency so that it gets up into the audio range, however, things start to get interesting. The modulation is so fast that you are now changing the shape of the original audio signal’s waveform, and new frequencies appear.
To illustrate how AM works, let’s hook an actual VCA to an oscilloscope and see what happens.
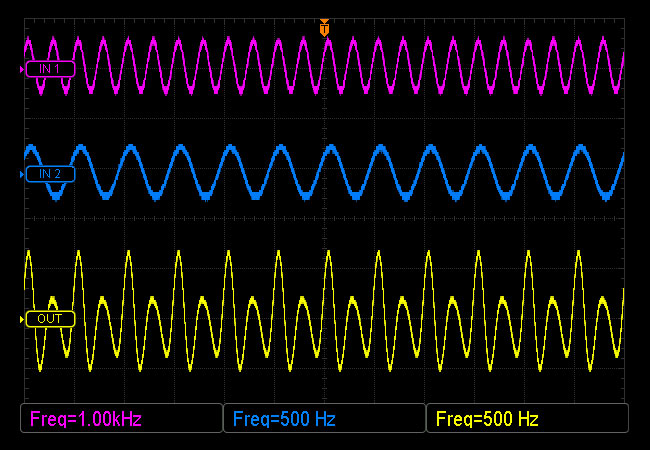
We’ll feed a bipolar (swings above and below 0V) 1kHz sine wave into the AUDIO IN jack; this is called the carrier. Next, let’s run a 500Hz sine wave into the MASTER CV IN jack; this is called the modulator. We’ll mix a DC offset voltage with the 500Hz wave so it is unipolar (the whole thing sits above 0V). Here’s what the input waves look like:
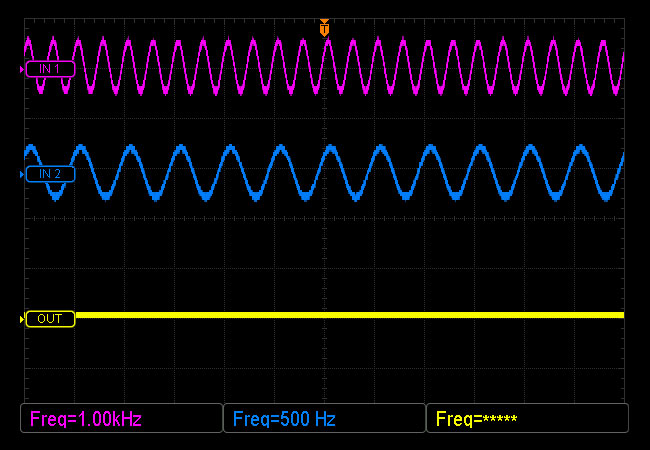
As we turn up the OUTPUT LVL control, a wave starts forming on the output. The farther above 0 volts wave 2 (the modulator) is at any given time, the more of wave 1 (the carrier) gets let through. Since the resulting output wave is created by an interaction between two different waves, it is going to be something other than a sine.
Remember from our lesson on harmonics that any signal other than a pure sine wave is going to have some frequencies other than the fundamental frequency in it? It so happens that the frequencies produced by amplitude-modulating one waveform with another have a very specific relationship. Take a look at this spectrum showing the frequencies contained in the output wave of our experiment:
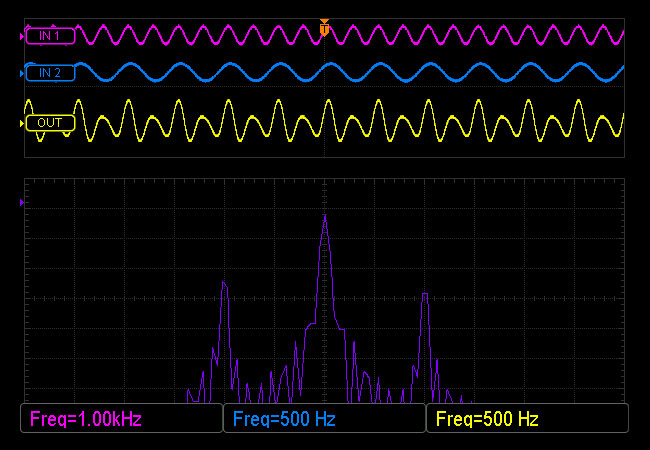
In the middle you can see the original carrier signal. There are also two smaller spikes above and below the carrier frequency. These are called sidebands, and they represent the sum and difference between the carrier and the modulator frequencies. The frequency of the upper sideband is equal to the frequency of the carrier plus that of the modulator. The frequency of the lower sideband is the frequency of the carrier minus that of the modulator.
- Upper sideband: Frequency= carrier+modulator
- Lower sideband: Frequency= carrier-modulator
Let’s use the scope’s cursors to take some measurements to see if this holds true.
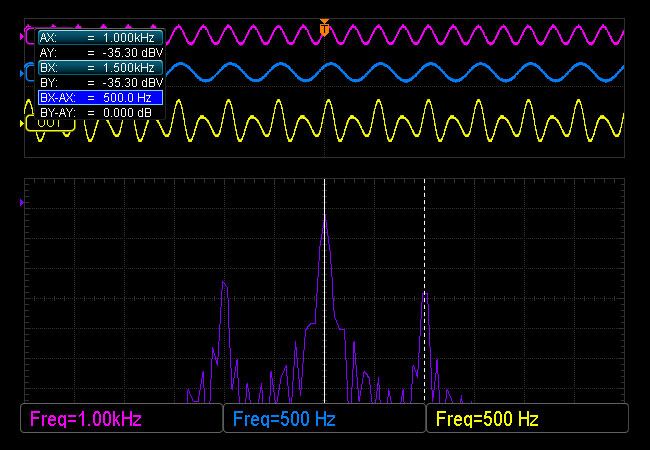
Cursor A is lined up with the big spike in the middle. Notice how it’s sitting right at 1kHz, which is the frequency of our carrier.
Cursor B is lined up with the upper sideband. It’s frequency is 1.5kHz, which is equal to the carrier’s 1kHz + the modulator’s 500Hz. You can also see in the blue highlighted text in the upper left that the difference between the two spikes is 500Hz. We don’t even need to use the cursors to see that the lower sideband is 500Hz below the carrier.
If you change one of the input frequencies, you change the relationship between the carrier and modulator and the sidebands appear at different locations. If you’re listening to the signal as you change the frequency, it can sound like the pitch is going up and down at the same time because the sidebands are moving in different directions (toward or away from the carrier).
Now you know how amplitude modulation adds brand-new frequencies to your signal that weren’t in either of the original waves. The sideband frequencies that get generated are quite often not musically related to each other, so AM tend to make things sound a bit dissonant, often metallic or “gongy”.
Some VCAs can do even more tricks, so don’t stop now! Continue on to the next lesson to learn about ring modulation.


Is this the final lesson? It says we’ll talk more about EGs later but this was the last lesson I hadn’t read.
Last one for now. We keep adding them, though!
Great tutorial so far, thank you! And keep going 🙂
Very helpful and informative tutorials. Thank you!